My shopping cart
Your cart is currently empty.
Continue ShoppingAfter 3.5 years of full-time family travel in a Grand Design Solitude 3740 BH, we realized our bunkroom needed some modifications to make it more functional for our growing children. This remodel of the fifth wheel bunkhouse was something that our family knew would have to happen eventually with the kids growing and one of the reasons we chose this RV was because we saw the potential of a remodel.
This blog post will explain how we were able to remodel our RV space in the fifth wheel bunkhouse.
The primary reason why we wanted to make changes was because our middle kiddo loves to read and has grown since we started this fulltime RV adventure making him unable to sit up in bed to read or do his schoolwork. The changes in a 5-year-old compared to a 9-year-old body is quite a bit. We wanted him to have a comfortable space where he could enjoy his books, stay focused on his studies, and also feel like he had his own space. In addition, as full-time travelers we need every bit of usable space available, so any modifications had to be done in such a way that maximized our small living area without sacrificing comfort.
Making modifications to an RV isn't as easy as a sticks and bricks home, however careful planning considering weight and space, we were able to do it. We are so thankful for the help of our friend Matt with @driventoventure for assisting us in the RV renovation.

Because we live in the RV fulltime, we had to do the renovation in sections so that the kids had somewhere to sleep as we changed the RV bunkhouse. The first thing we did was remove the bunk from the RV slide. Because the goal of this renovation was to have enough head clearance for the upper bunk, we still had to make sure the lower bunk would have enough since we were completely changing the location of it. The lower bunk had plenty of headspace in its original spot, but for the best use of space in the bunkroom, we decided to move it underneath the bunk slide or else that area would have been wasted space.

The original upper bunk in the slide had the ability to hinge up so that there would be more headspace below. We did not use this because we put a permanent railing up and there was not enough ceiling clearance for this. The side walls of the slide had what felt like a small plate where the bunk was anchored to and because we were going to build a new bed frame, we added some reinforcement to anchor the new bed to.

The custom ladder that was built by Elrod Timber and connected the bunkbeds along the original wall we used for the new set of beds. Then we finished out the frame for the upper bunk.

The built in cabinet area of the fifth wheel was the second reason we decided to do a complete remodel versus just moving the bunks. The current system no longer worked. We made a modification that you can read about here, but that was just a temporary fix until we decided what the game plan was on this bunkroom.
Here is what the RV cabinets looked like when we first moved in. The mirrored cabinets opened up, one side had a rod for hanging clothes and the other sides had shelves that we used for books. 
Pre-fabricated drawers that we put into the cabinet where the hanging clothes were supposed to go. We reused these drawers that we with plans to put underneath of the new bunkbed.

While the drawers that we had did not take up the ENTIRE depth of space under the bed, it was more functional space than if we did not put any storage underneath the new beds. All 4 drawers fit perfectly!

Once the bunks in the RV fifth wheel slide were finished, we started demolition of the other side of the bunkhouse. We kept the full-size bed the same size, reusing the base of that but with plans to put in an IKEA storage cube we had to make some alterations.
Things that we changed:
I previously had this Ari Rainbow Wallpaper in Kendall's bunk area from LoomWell and I removed it from without any issues. There was no adhesive or damage to the wall from the wallpaper.
Each of the drawers, 4 of them total in this unit, weighed 6 lbs each plus 1.5 pounds of hardware for each drawer. With being a home on wheels, every little bit of weight counts!

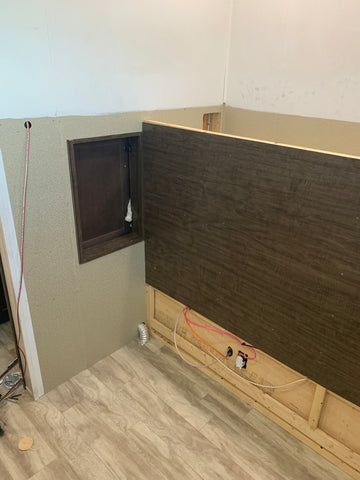
There was a cabinet in the bathroom that extended into the original closet system. We put a back on that cabinet to make it more of a medicine cabinet, and built a new base for the full size bed to sit on. Behind the closet system is the outdoor kitchen.
This is what the wall looked like when we took out the closet system and removed the upper bed. You can see that brown box-like cabinet was deep and extended behind the original closets.

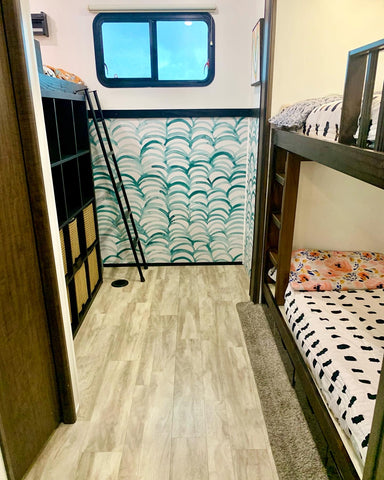
To replace the closet system, we used the IKEA cube unit for the clothing, toys, and book storage. The metal ladder that was previously being use for the upper bunk in the slide was swapped over to this side of the RV bunk for easy accessibility.

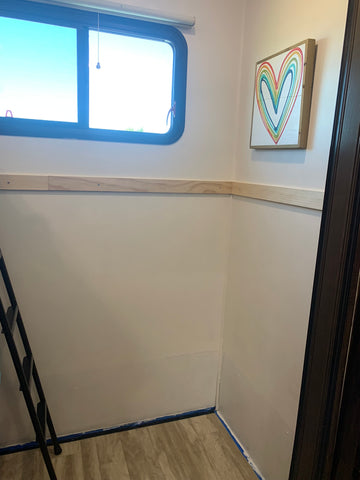
The wall had a lot of holes in the wall from the previous RV bunkbed so I decided to put a wood piece across the wall to cover that up.

I added the Clarence Wallpaper from Loomwell below to finish the room up. Use the code BROOKEHAPPE for 15% off your orders.
There was a heat vent on the bottom on the bunk bed that we moved from the wall. It was coming up from the bottom of the floor and then angled out the bottom of the bed. Because we were removing the entire base and RV bunkbed. Matt was able to use the original vent face cover, shorten the vent and place it in the floor. You can see it in the floor below!
Here is the final result!


Making modifications can be difficult and it's a commitment especially when you live fulltime in the RV, but if you plan ahead and take your time with each step you can create a unique living space tailored specifically for your family's needs. Our Grand Design Solitude 3740 BH is now a much more functional home on wheels for us as our kiddos grow and we explore the U.S.A. Whether you're looking for extra sleeping space or storage solutions, there are plenty of options available that fit any budget! Don't be afraid to alter your home on wheels to fit your families needs; you never know what amazing things await you on the open road!
Read More: 9 Ideas to Update RV